Best Polytunnel Kits Australia: What to Look For Before You Buy
Looking for the best polytunnel kits in Australia? A quick online search will uncover everything from low-cost backyard greenhouse kits to large commercial polytunnels designed for long-term food production. From photographs alone, many of them can look remarkably similar: a curved frame, a plastic cover and room to grow a few rows of vegetables.
However, the real differences usually become apparent after the tunnel has been exposed to Australian conditions.
Strong UV, summer heat, sudden storms, heavy rain and persistent wind can quickly test the quality of the frame, cover, fixings and ventilation. A tunnel that performs adequately in a protected English cottage garden may not be suitable for an Australian property enduring a subtropical summer.
That does not mean you always need to buy the biggest or most expensive polytunnel available. It means you need to understand what you are paying for, and whether the structure is suited to your site, climate and intended use.
Before choosing a polytunnel kit, look beyond its dimensions and initial price. Compare how it is built, how you will manage the growing environment and what support will be available during its construction and throughout its usable life.
Are cheap polytunnel kits worth buying?
Cheap polytunnel kits can have a place.
If you are experimenting with protected growing, have a sheltered site and only need a structure for temporary or seasonal use, a basic kit may allow you to test the idea without making a large initial investment.
Problems arise when a temporary garden product is purchased with the expectation that it will perform like permanent growing infrastructure.
A lower-priced kit may use:
Lightweight steel, aluminium or wooden framing which corrodes and rots easily
Push-fit connectors or plastic joints that break and can’t withstand windy conditions
Thin, unsupported plastic film. Without UV protection, it will have a very limited lifespan.
Limited bracing, reducing its ability to be installed in windy areas.
Small doors and few ventilation openings, making the enclosure hotter than it needs to be in summertime.
Short sidewalls, giving you limited room to stand. You want to be comfortable gardening across every inch of your tunnel.
Basic pegs or anchors. Great if you need to move your tunnel, but less effective for tunnels designed for longevity and sudden wind gusts .
Components that cannot be purchased separately. Making it a matter of replacing your entire structure should anything need repairing.
A short or heavily restricted warranty.
These features are not necessarily a problem if they align with your expectations. But they may become costly if you need to replace the cover, reinforce the frame, add ventilation or replace the entire tunnel after only a few growing seasons.
The better question is not simply, “Is this polytunnel cheap?”
It is: “Will this tunnel do the job I need it to do, for as long as I expect it to?”
Compare the total cost, not just the advertised price
The purchase price is only one part of what a polytunnel will cost to own.
Imagine a home grower buys an inexpensive kit and spends several weekends preparing the site, building garden beds and establishing tomatoes, cucumbers and leafy greens. During the summer, the tunnel becomes difficult to ventilate. The doors are too small to release enough heat, so the grower adds shade cloth and attempts to modify the sides.
A storm later damages the cover and bends a lightweight connector. The original supplier does not sell individual replacement parts, so the grower must improvise a repair or purchase another complete kit.
The initial price was low, but the grower has now paid for modifications, repairs, replacement materials and potentially lost crops.
By comparison, a more durable tunnel may cost more upfront but includes a stronger frame, appropriate bracing, reinforced covering, effective ventilation and access to replacement components. Over many years of use, the annual cost may be lower.
When comparing polytunnel kits, consider:
Total ownership cost = purchase price + delivery + site preparation + installation + maintenance + repairs + replacement parts + future cover replacement
For serious home growers and commercial producers, the cost of downtime or crop loss should also be considered. A structure protecting your food or income needs to be reliable.
Look for a frame designed for long-term use
A polytunnel frame must withstand constant forces from the tensioned cover, changing temperatures, wind and weather.
Many products are described as “heavy duty,” but this is a marketing term rather than a meaningful technical specification. Ask what the frame is actually made from.
For long-term Australian applications, hot-dip galvanised steel is generally preferred because it provides strength and corrosion resistance. During hot-dip galvanising, steel is coated in zinc to protect it from environmental exposure.
However, the words “galvanised steel” do not tell you everything. Two frames can look similar while using different tube diameters, wall thicknesses, coatings, connectors and bracing systems.
Ask the supplier:
Is the steel hot-dip galvanised?
What are the tube diameter and wall thickness?
What bracing is included?
How are the arches connected?
Are the joins secured mechanically?
Does the structure come with an engineers certificate?
Is it suitable for the wind conditions at your site?
The quality of the frame should be assessed as a complete structure. Strong steel hoops will not compensate for weak joins, inadequate bracing or unsuitable anchoring.
The GROW Tunnels frame
Every GROW Tunnel, from the Mini through to Commercial, utilises hot-dipped galvanised steel, and comes with a 10-year frame warranty. Nuts and bolts used are high-grade Stainless Steel.
Choose a cover made for Australian UV exposure
The cover is one of the hardest-working parts of a polytunnel. It is exposed to sunlight, heat, wind, rain and changing temperatures every day.
Basic plastic film may be suitable for short-term crop protection, but it can become brittle, discoloured or prone to tearing when exposed to high UV levels over time. Once the cover begins to weaken, wind movement can accelerate the damage, and before you know it, you’re having to replace the entire roof covering.
For a long-term tunnel, look for greenhouse-grade, UV-stabilised covering. Reinforced woven materials offer additional tear resistance compared with lightweight unsupported films.
GROW Tunnels use reinforced Solarweave covers designed to filter UV while allowing useful light into the growing space. The reinforced construction provides greater durability than the thin plastic commonly supplied with entry-level garden kits.
When comparing covers, ask:
Is the material designed for greenhouse use?
Is it UV-stabilised for Australian conditions?
Is it reinforced?
What level of light transmission does it provide?
Does it diffuse light?
What warranty applies specifically to UV degradation?
Can you purchase a replacement cover separately?
Is the cover cut or manufactured to fit the frame properly?
Remember that expected lifespan and warranty length are not necessarily the same. Ask the supplier to explain both.
Installation also matters. Even a good cover can wear prematurely if it is loose, poorly tensioned or repeatedly rubbing against the frame. Ensure that you’re utilising frameguard tape between the cover and your frame structure to avoid friction degradation.
About GROW Tunnels’ Solarweave cover
At GROW Tunnels, we stock only commercial quality covers, no matter what size you decide upon. That way, whether you’re a backyard or a commercial grower, you can rest assured that your cover will last years, not just one season like cheaper varieties.
Plan for an Australian summer
Many people buy a polytunnel because they want warmer conditions during winter, protection from rain or an earlier start to the growing season.
The overlooked question is what happens in summer.
On a hot, still day, the temperature inside a poorly ventilated tunnel can rise rapidly. This can stress plants, increase water demand, affect fruit set and make the space uncomfortable to work in. High humidity and condensation can also contribute to fungal disease.
Small doors at either end, or short side wall height, may not provide enough airflow, particularly in a longer tunnel.
Effective options can include:
Roll-up sides
Large end openings
Cross-flow ventilation
Higher sidewalls
Shade cloth or internal shading
Circulation or extraction fans
Automated ventilation systems
The right combination depends on your climate, tunnel size and crops.
A grower in Tasmania may place greater emphasis on retaining warmth. A grower in northern New South Wales or Queensland is more likely to need generous ventilation and summer shade. In very hot regions, a shadehouse may be more appropriate for some crops.
Before buying, ask yourself:
“How will I manage this tunnel during the hottest week of the year?”
If the answer is unclear, the ventilation design needs more consideration.
You can learn more about ventilation and keeping crops cool in your polytunnel in our article here.
Managing Ventilation in Your GROW Tunnel
The 2M high side walls of our Mini & Rural GROW Tunnels, and 3M high side walls in our Commercial model allow for plenty of airflow across the tunnel. The Solarweave cover is rolled up during warmer weather, exposing the insect mesh or shadenet side wall. This keeps your physical barrier from pests, but allows for airflow.
GROW Tunnels also include an easy-access dual sliding door system. This includes an insect net or shadenet internal door, and Solarweave external door. Just like with the roll up sides, you can leave the external door open during warmer weather, to allow airflow down the length of the tunnel.
Check wind resistance,bracing and anchoring
Australian weather can change quickly. A calm site can be exposed to powerful gusts during a storm, while buildings, trees and hills can redirect wind and create localised turbulence.
This makes wind resistance one of the most important (but also one of the most easily misunderstood) polytunnel specifications.
A wind rating may only apply when the tunnel is:
Installed according to engineering specifications
Anchored using the nominated system
Built in suitable soil conditions
Correctly braced
Fitted with a properly tensioned cover
Used with doors and sides secured appropriately
A rating should not be interpreted as a guarantee that a tunnel will withstand every severe weather event.
Anchoring must also suit the site. Basic pegs may be adequate for a small temporary structure in a protected backyard, but they are unlikely to be appropriate for a large tunnel on an exposed rural property.
Consider your soil, slope, prevailing winds, nearby buildings, trees and the level of exposure. For larger installations, ask whether site-specific engineering or anchoring advice is required.
Be cautious of any supplier who promises that a tunnel is “storm-proof” without asking questions about where and how it will be installed.
Are GROW Tunnels suitable for high-wind areas?
Yes, our GROW Tunnels come with an engineers certificate certifying them for wind gusts up to 130km/h. There are some important considerations when placing any tunnel in a windy environment. Book a call with our team who can discuss with you how to select the best location for your tunnel if you are in a high-wind area.
Consider the size you can actually use
The advertised footprint does not always reflect the amount of practical growing space inside a tunnel.
Curved walls can reduce headroom and restrict where tall crops, shelving or raised beds can be positioned. Narrow doors may limit access for wheelbarrows, equipment or machinery.
Before selecting a kit, consider:
Internal height across the full width of the polytunnel.
Is the width of the tunnel all usable space that you can stand, grow and harvest easily in?Straight sidewall height
The higher the wall, the more cross-ventilation you can get in your tunnel.Door width and height
Consider what needs to access the tunnel. Will the opening suffice? Does the door allow easy access when manoeuvring wheelbarrows or seedling trays?Path and garden-bed layout
Does the width of the tunnel allow for adequate pathways between garden beds? Are garden beds wide enough to accommodate what you would like to grow, but not too wide you can’t reach the entirety of the crops.Space for climbing crops
Consider the center height of your tunnel, as this is the best place for trellising.
It’s also important to consider how you’ll utilise the space inside the tunnel, before deciding the best size for your setup. A home grower may initially plan to grow a few tomatoes but later add raised beds, seedling shelves, cucumbers and vertically trained crops. A flower farmer may need enough working room to harvest without damaging neighbouring rows. A nursery may require bench space and easy movement of trolleys.
Buying the smallest possible tunnel can reduce the upfront cost, but replacing an undersized structure later is rarely economical. Think about how your growing plans may develop over the next three to five years.
Not sure which size is best for you?
Check out our Mini, Rural and Commercial GROW Tunnel comparison page here.
Make sure rainwater and drainage have been considered
A polytunnel roof can capture a substantial amount of water during heavy rain.
In a small backyard tunnel, that water may simply run from the cover onto the surrounding ground. On a larger structure, uncontrolled runoff can cause pooling, erosion or waterlogging around the tunnel.
Before installation, consider the natural slope of the site and where water will move. Rural and commercial growers may benefit from integrated gutters that collect rainwater and direct it toward storage or drainage systems.
Guttering also creates an opportunity to capture water for irrigation, although the storage and distribution system must be appropriately designed.
Avoid installing a tunnel in a low-lying area simply because the site is flat and convenient. A protected growing space will not perform well if its paths and garden beds flood after every major downpour.
Harvesting Rainwater from your GROW Tunnel
Our Rural and Commercial GROW Tunnels all come with steel gutters, enabling you to create a closed-loop irrigation system. In Australian climates, where water is a precious resource, this just makes sense. Looking at a Mini GROW Tunnel and want gutters? We can add them on for an additional cost.
Check whether replacement parts will be available
A well-built tunnel should be repairable. Not simply replaceable.
Even when the main structure remains sound, covers and moving components will eventually experience wear. A door can be damaged, a roll-up mechanism may need attention or a vehicle might accidentally strike part of the frame.
Ask whether you can purchase individual:
Frame components
Braces and connectors
Doors and door hardware
Cover material
Roll-up side components
Gutters and brackets
Fixings and fasteners
Some cheap kits effectively become disposable because replacement parts are unavailable or the product design changes frequently.
A durable frame combined with replaceable covers and components gives the tunnel a much longer useful life.
GROW Tunnel replacement parts
Our tunnel parts are all available to order in our online shop. Can’t see what you’re looking for, or looking to replace parts on a different polytunnel? Reach out to our team to chat about your unique requirements.
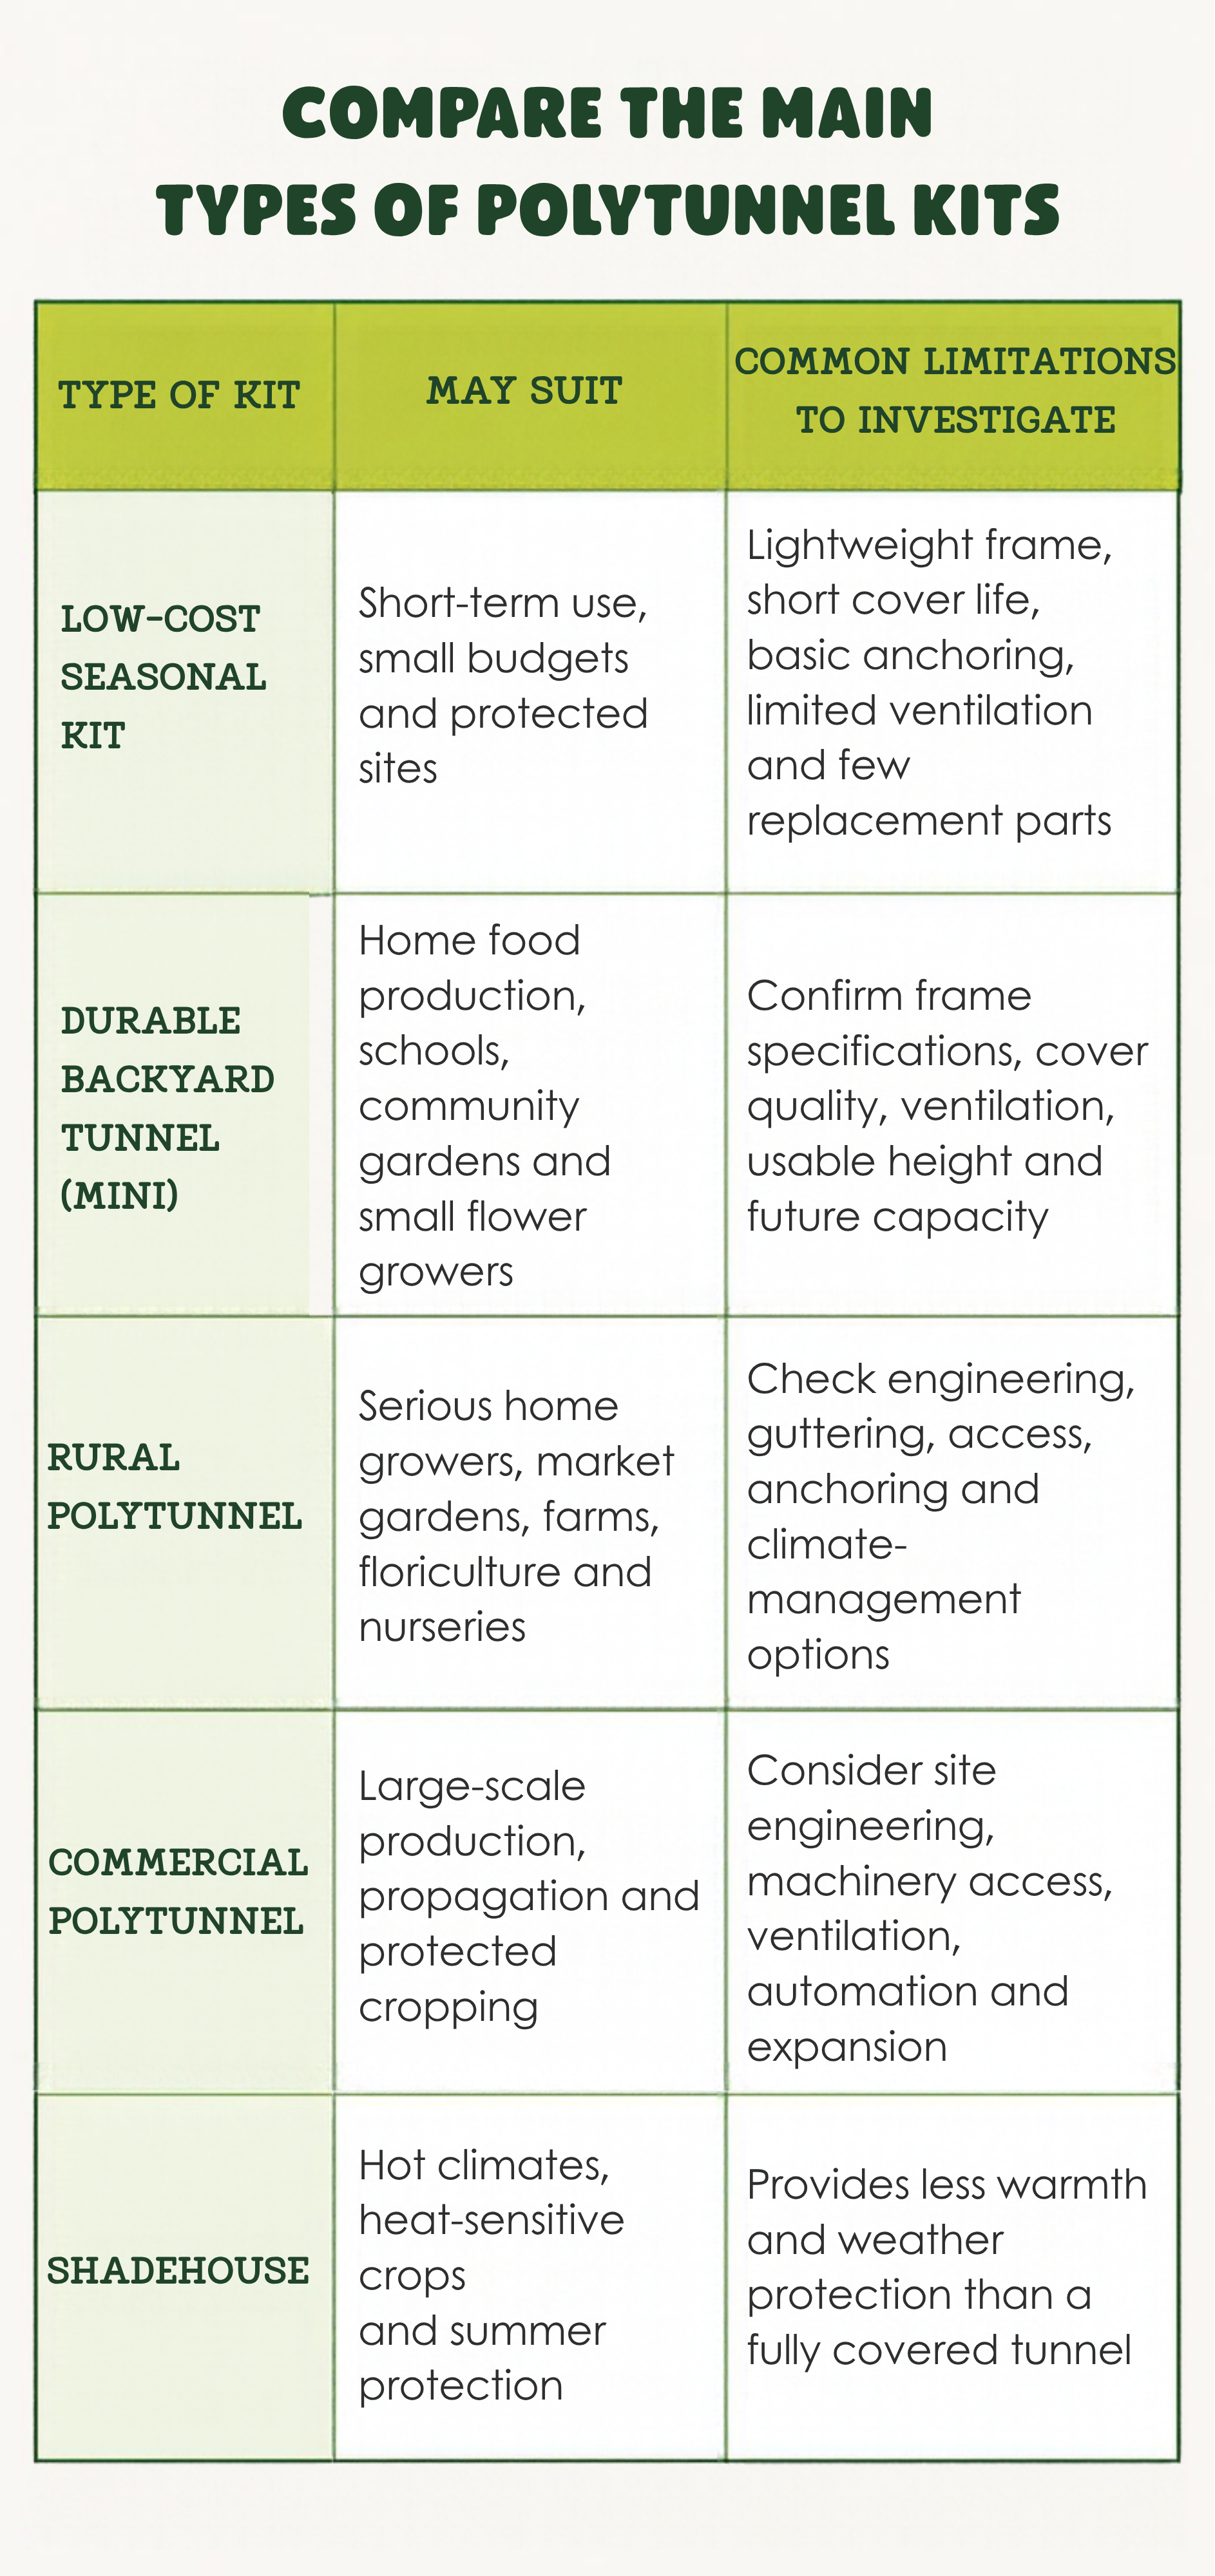
There is no single best category for everyone. A low-cost kit may be perfectly adequate for a short experiment, while a grower relying on the structure for food production or income will usually benefit from investing in a more durable system.
Questions to ask before buying a polytunnel kit
Before accepting a quote, ask the supplier:
What type, diameter and thickness of steel is used?
Is the complete frame hot-dip galvanised?
What bracing and anchoring are included?
What cover material is supplied?
Is the cover reinforced and UV-stabilised?
What warranties apply?
Is this type of tunnel suitable for my site and local conditions?
Can individual components be purchased?
What site preparation is required?
Are detailed installation instructions provided?
Is support available during and after installation?
Can the tunnel be extended or modified later?
A knowledgeable supplier should be able to explain why each feature matters. Simply describing a structure as “commercial grade” or “heavy duty” is not enough.
So, what is the best polytunnel kit in Australia?
The best polytunnel kit is not automatically the cheapest, the most expensive or the largest. It is the tunnel that:
Suits your climate and site exposure
Provides adequate growing and working space
Uses materials appropriate for Australian UV and weather
Can be ventilated effectively throughout summer
Is securely anchored and correctly installed
Has clear warranty coverage
Can be repaired with readily available parts
Is supported by people who understand how you intend to use it
If you only need temporary crop protection in a sheltered garden, an inexpensive kit may be enough. If you are building a productive food garden, market garden, flower farm or commercial growing system, durability and reliability should carry much more weight.
GROW Tunnels are designed as long-term growing infrastructure for Australian home, rural and commercial growers. Our range includes Mini Tunnels, Rural Tunnels, Commercial Tunnels and Mini Shadehouses for different climates, sites and growing goals.
Most importantly, GROW is run by growers. Our recommendations are informed by more than 30 years of experience across organic farming, market gardening and agricultural consulting—not simply by what can fit inside a box.
Explore the GROW Tunnel range, or speak with our team about the most suitable option for your location, crops and long-term plans.